Using Microsoft Outlook
The University uses Microsoft Outlook as the major email and messaging environment. This document focuses on the basic operations to get you started. For details on how to set up a user profile to work with our email servers, please refer to Microsoft Outlook Profile.
Functions:
Cleaning Up Messages
Using Personal Folders
Email Forwarding
Junk Mail Filtering
Automatic Replies (Out of Office)
Cleaning Up Messages
Email messages will use up your email disk quota. You are recommended to remove obsolete messages regularly to free up space. Besides the Inbox folder, there are some other folders that sometimes you may need to manually remove their items:
- Deleted Items
When you delete a message, it will be placed in this folder. It will only be permanently removed when emptying the "Deleted Items" Folder. - Sent Items
Copies of messages that you sent are stored in this folder.
To clean up messages from any of the above folders, first select the folder to view its content. Use the method mentioned in the previous section Deleting Messages to delete the items in the folder.
Using Personal Folders
Besides deleting unwanted emails to free quota space, you may also backup your emails to Personal Folders. If you do not have one, you may create a new Personal Folder using the steps below:
- In Outlook, select New Items -> More Items -> Outlook Data File from the "Home" tab.
- Make sure Personal Folders File (.pst) is selected and click OK.

- Select the storage location (e.g., D:\Email_Archive) and enter the file name (e.g., "My Outlook Data File.pst") of the personal folder.

- Click OK.
- A personal folder will be added to the folder list (the file name will be used as the display name in Outlook), and you can either move your emails or copy them to the personal folder.

- If you choose to move the emails to the personal folder, it will free quota space in the server. Note that the emails in the personal folder are stored in the storage location specified above.
Email Forwarding
To automatically forward your emails to another email address, please follow the steps:
- In Outlook, choose File from the ribbon bar.
- Select Manage Rules & Alerts.

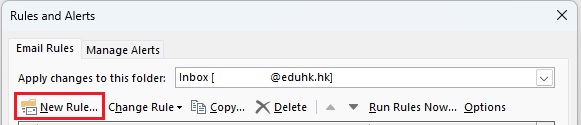
- Click New Rule... to create a new rule.
- Select Apply rule on messages I receive under the "Start from a blank rule session. And click Next to continue.

- Tick where my name is in the To or Cc box and click Next.

- Tick forward it to people or public group as an attachment. Click on people or public group in the lower panel.

- Select the required address in the "Rule Address" window. If the required address is an Internet address, you can enter the full email address in the box directly.

- Click OK in the Rule Address window to proceed.
- Click Next twice and then give a name for the rule (e.g., Email Forward).
- Make sure Turn on this rule is checked, then click Finish.

- Finally, click OK. Whenever necessary, you may uncheck the corresponding box to turn off the rule.
Junk Mail Filtering
OCIO has subscribed a email security gateway service to provide spam filtering functions for all staff members and staff related email accounts on Office 365. Incoming emails from the Internet will first go through the system, and based on its own algorithm it will determine if a mail is likely to be a spam. Suspected spam will be stored in the system and a digest of the suspected spam will be sent to the users by email on a daily basis; whereas 'good' mails will be sent to user's mailbox as usual. If needed, users can "release" any of the filtered messages to their mailboxes through the notification email.
For details, please visit Email Security Gateway.
Automatic Replies (Out of Office)
You may set up an automatic 'Out of Office' reply using "Automatic Replies" when you are not in the office. To do that, follow the steps:
- In Outlook, choose File from the ribbon bar.
- Select Automatic Replies.
")
- Select Send automatic replies. Then enter the automatic reply message in the text box provided.
- You can select Do not send automatic replies to turn it off manually or set the time range to send the replies.
- Click OK to save the setting.
